
There are dozens of different ways a beginner can monetize a blog. So many in fact, that one can get overwhelmed. Want to know how to make money blogging for beginners? In this article I’m going to share the first 2 ways I monetize all of my blogs.
More importantly though, I’m going to get you a high overview of the primary steps you have to take in order to create an income generating content website. 8 steps to be precise. Some of these steps are deserving of their own detailed write up, but for now at least you’ll know WHAT to research.
The monetization methods mentioned in this article are my 2 personal choices when starting out. With one you can get started right away, with the other you have a short term goal to shoot for. Neither of these offer instant ROI. My blogging methods take time to work, and it usually takes a while to earn money from doing it. The payoff is delayed by months or even a year in some cases.
Having said all that, let’s get to the actual guide!
How to make money blogging for beginners – 8 steps
The following 8 steps are actions that you must take in order to build an income generating blog. Each step is important, and they should be done in the order listed below with a couple of caveats.
To make money blogging if you’re a complete beginner, you’ll first need to:
1. Choose a niche

This is always the first step in making a blog and it’s also where most people get hung up. My strategy is as simple as choosing a hobby, interest, or topic, then researching various things about the potential niche. Things that help you determine if it’s going to be viable for a blog where the intent is to make money.
A few things I always look at are:
- How popular the niche is
- The search volume around it
- If there are products to promote
- Potential affiliate offers
- The current competition
In the end you just have to choose something. Just choose something using your best judgement, you might still make a bad choice for whatever reason, but you’ll learn a lot and the second time you go through these steps you’ll make better choices.
Thanks how it went down for me.
Here’s an article I wrote on how to choose a niche
2. Buy a domain
Buying a domain is a crucial step, and if you bungle it badly enough you may have to start over. Assuming we’re buying a brand-new domain name here, there are really 2 ways to go.
You can choose a brandable domain, or a niche relevant domain.
If you go with a brandable domain you really have a lot of options, you can even use made up words.
An example of some brandable domains are:
- Uber.com
- Nike.com
- Apple.com
- Google.com
If you didn’t already know, then the companies behind any of these brands could be selling anything.
If you go with a niche-relevant domain, keep the domain name broad enough so that you can expand the website later on.
You see a lot of people simply taking the primary keyword or name of the niche and just adding descriptive modifiers to the end of it, and choosing the domain that way. This way can work, but you might box yourself in. If you’re ok with that then this can work.
If your niche choice was the game of chess, then an example of this would be:
- chessexperts.com
- chessworld.com
- chessboss.com
Having said that, I usually go with a niche-relevant domain. I like to get the main keyword in the domain if possible, though I always choose my domains so that they have the potential to become authority sites in the space.
So once, you’ve weighed your options and narrowed it down to a final choice, go ahead and register your domain at Namecheap.com.

Here’s an article I wrote on how to choose a domain name
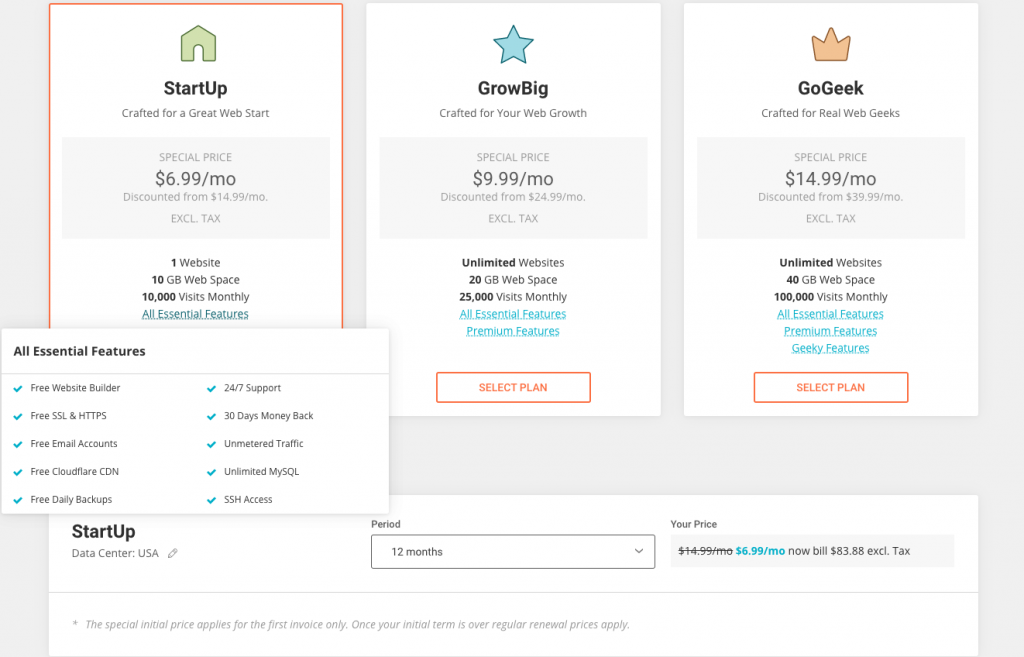
3. Sign up for hosting
Signing up for hosting is as simple as buying the domain was. You simply go to your host of choice and sign up for a shared hosting plan, if you’re just starting then typically the lowest one offered is fine.
I recommend Siteground for beginners, it’s really easy to set up and get started with. Then they have great support and uptime after the fact. Simply go to the signup page by clicking the link below, you can choose either shared hosting or WordPress hosting, I think it’s the same thing.
You’re looking at about $88 for your entire first year, not bad. You really don’t need to upgrade to either of the other plans right now so don’t get distracted, you can always do that later if you want. Once you done that you can move on to the next step.
4. Build your site
Now that you have purchased a domain and hosting, you need to point the domain towards your web host if you haven’t already. Check out the following to guides to learn how to do that:
Once that’s done you can go ahead and install you website platform of choice. Myself and most of the blogging world use WordPress, so that’s what I recommend.
- Install WordPress
- Install a theme (I recommend GeneratePress, there’s a free and premium version)
Now feel free to spend a little bit of time customizing your site, but seriously no more than a few hours. The design and aesthetics seriously don’t matter at this point, don’t even bother with a logo yet. No one will see your site for weeks or even months unless you are actively promoting it from the beginning.
Add your required pages
There are a few pages every website should have, even in the beginning. Those pages are:
- About
- Contact
- Privacy Policy
- Disclaimer
- Terms and Conditions
Once the website is live on the internet, and has your required pages, you’re ready to move on to the next step.
5. Keyword/Topic research
After you have your site built and ready for content to be added, it’s time to start doing some keyword research and making a list of topics to write about.
This is probably one of the most important tasks you do in this guide. It’s one that I will probably never outsource. If you mess this up you probably won’t make much money as a blogger.
The above video I made shows me doing keyword research in an example niche that I used for the video. There are many ways to do keyword research, sometimes referred to as topic research or topic analysis.
This is just an example of how I might go about searching for some low-competition topics to write about.
Keywords Everywhere is one of the only paid tools that I use for keyword research, most of what I need is provided for free by Google.
It’s also a good idea to just do some general research about your niche, especially if you aren’t already well-versed in it. If you chose a niche that you are already knowledgable about then good for you, things will be much easier for you in many ways.
6. Write articles
This is the part where you sit down at a computer and starting writing extremely helpful articles about things in your niche. The goal is to create the best content you can with the resources you have, and consistently publish it to your site.
The big sites are going to have teams of people with loads of resources to pour into even a single article, but you won’t have that. That’s part of the reason why we chose low competition topics in the previous step. We can publish plain old good content and still be able to rank for it.
Hire people to write them
If you don’t have the time to write but have the money to pay for content, then by all means you should consider outsourcing this type of stuff.
However do not try to do it before you can even do it yourself. You need to know how to do the thing that you are outsourcing before you outsource it or who’s going to check the freelancer’s work?
Having said that, I usually hire writers on Upwork. There are plenty of other options out there though.
7. Let them rank in Google
Now that you’ve written or purchased a good amount of content, it’s really a waiting game in many ways. It takes several months in most cases for your articles to begin ranking in Google. When people refer to something “ranking in Google” they typically mean making it to the first page of Google results for that search.
Or at least that’s what I mean when I say it.
There are certainly things that you can do to speed up the process, such as link building. While many people do outreach, promotion, and link-building, I don’t. I play the long-game and let my content rank on its own merits. It takes a lot longer a lot of the time, but that’s fine. I prefer to spend my time creating new content.
8. Monetize the content
You can add affiliate links to your content as you publish it, and I recommend that you do. You probably won’t be able to put ads on your site until you get some meaningful traffic coming in though.
Either way, the entire goal here was to monetize the content and make money off of the traffic. So that’s the final step.
Amazon Associates
The Amazon affiliate program is probably the easiest way to get started with affiliate marketing. You can sign up immediately without any type of minimum requirements, but you do have to make 3 qualified sales within 180 days in order to be officially approved for Amazon Associates.
Ezoic
Ezoic is where I go when I’m ready to put ads on a new site. They usually require at least 10k sessions/month before they allow you on their platform, but exceptions can be made. Sometimes it’s worth asking to get in early if you’re not quite there yet but you believe you have a nice looking website with solid content.
Conclusion
So obviously this wasn’t meant to be an in-depth guide for how to make money blogging, more of a step by step high overview guide that just shows the steps one must take to get there.
Each of these steps will require some further investigating and research.